Pages

Jan 31, 2012

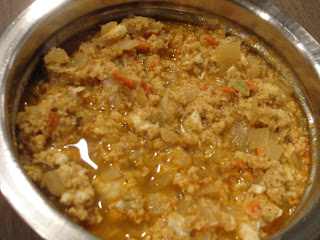
Green gram curry / Pachapayaru curry!!!!

Hi guys!!!

I try really hard to include pulses in our diet on a regular basis. Everytime I try to prepare something with healthier ingredients I have to come up with the usual "I am not eating healthy because of u Ganesh" card and succeed in making him eat :-)

The green gram curry used to be a regular back at my home. Almost once in a week mom used to prepare this curry for chapathi. I love this curry and try to prepare it atleast once in a month now. The curry tastes great and can be prepared quickly as well. 

Lets look at the recipe now.

Ingredients:

Whole green gram - 1 cup
Tomato - 1 medium
Green chilli - 1 or 2
Turmeric powder - 1/2 tsp
Chilli powder - 1 tsp
Corriander powder - 1 tsp
Grated coconut - 1/2 cup
Cumin seeds - 1 tsp
Salt - as required

To season:
Oil - 2 tbsp
Mustard seeds - 1 tsp
Cumin seeds - 1 tsp
Curry leaves - a bunch


Procedure:

1. Pressure cook the green gram for 10 minutes and set aside. There is no need to soak overnight.
2. Heat oil in a kadai and add all the items required for seasoning. Next add the chopped chillies and tomato and saute till the tomatoes are cooked.
3. Next add the cooked green gram along with a 1/2 cup of water ( add water according to the consistency of the gravy required). 
4. Now add all the masala powders and salt and mix well. Close the lid and cook for 5 - 10 minutes.
5. Meanwhile, grind the coconut along with the cumin seeds to a paste. 
6. When the gravy no longer releases raw smell from the masala powders, add the ground coconut paste and mix well. Let the curry simmer for 5 minutes.

Serve hot with chapathis.

Jan 30, 2012

Roast Chicken!!!

Hi guys!!!

Yet another weekend special... roast chicken!!!! A whole chicken seasoned with spices and roast (in my case actually baked). This is usually called grilled chicken in India. This is one of my dad's favourite too..

The advantage of having an oven at home is that you get to cook all these dishes that once you could only have in a restaurant. I prepared roast chicken on Sunday - a perfect weekend lunch!!!!

Now lets get to the recipe.

Ingredients:
Serves - 2 people

Chicken - 1 small
Yogurt - 2 tbsp
Turmeric powder - 1/2 tsp
Chilli powder - 2 tsp
Corriander powder - 1 1/2 tsp
Fennel powder - 1 tsp
Garam masala - 1 1/2 tsp
Salt - to taste
Olive oil - 1 tbsp


Procedure:

1. Was the chicken well and pat dry. Make incisions all over the chicken with a sharp knife.
2. Mix all the masala powders, yogurt, salt and olive oil in a bowl separately. Now start rubbing this mixture all over the chicken. Make sure the masala is well applied beneath the skin and the incisions. Also, apply some masala in the cavity.
3. Now let the chicken marinate overnight in the refrigerator. It requires about 8 hours of marination so overnight works best.
4. Preheat the oven to 240C. Line a baking sheet with aluminium foil. Wrap the chicken well with aluminium foil leaving no gap. Now place the wrapped chicken on the baking sheet and pop it in the oven.
5. You have to cook the chicken at 240C for 20 minutes. Immediately turn it down to 200C and continue cooking for another 25-30 minutes.
6. Now take the baking sheet out of the oven and take the chicken out of the foil. Also, change the foil on the baking sheet 'coz there would be so much fat.
7. Once you have changed the foil, place the chicken back on the sheet and pop it in the oven. Cook now at 200C with the chicken left unwrapped for 15 minutes. By then the top would have turned brown and crispy.
8. Now turn over the chicken and cook for another 20 minutes so that it is evenly cooked and browned.
9. Turn off the oven and let the chicken stay in the oven for about 10 minutes before you serve.

Carve and enjoy!!!!!

Rava paniyaram!!!

Hi guys!!!

Rava paniyaram is a simple to make evening snack. You need the simplest of the ingredients and it can be prepared without the paniyaram pan. I was craving to eat something sweet over the weekend and I prepared this quick snack.

Lets take a look at the recipe.

Ingredients:

Rava - 1 cup
Maida / All purpose flour - 3/4 cup
Sugar - 1 cup
Cardamom powder - 1/2 tsp
Oil - for frying


Procedure:

1. Soak the rava in water. Add enough water to just form a paste with rava and no water should stand above the rava. Let this stand for half an hour.
2. Now mix the maida, sugar and cardamom powder to the rava paste. Add little water if needed. The consistency should be something like thick vada batter.
3. Heat the oil and pour the batter from a ladle. Pour one at a time and cook till it turns golden brown on both sides.

This is a great snack at tea time. 

Jan 26, 2012

Scrambled egg curry!!!

Hi guys!!!

I consider the scrambled egg curry to be the "Curry cousin" of egg bhurji. A very simple curry that tastes good with rotis. The sheer simplicity of the recipe and the yummy result prompts me to prepare this quite often. I make sure that we have atleast 3 eggs in a week in any form. It is mostly omelette for breakfast or boiled egg as such. Occasionally it is egg bhurji or this scrambled egg curry.

Now lets get to the recipe.

Ingredients:
Serves - 2 people

Eggs - 3
Onion - 1 big
Tomato - 1 big
Ginger garlic paste - 1 tsp
Cinnamon - 1" stick
Cardamom - 2 pods
Cloves - 3 or 4
Star Anise - 1
Turmeric powder - 1/2 tsp
Chilli powder - 1 tsp
Corriander powder - 1 tsp
Garam masala - 1 tsp
Salt - as required
Oil - 2 tbsp


Procedure:

1. Heat oil in a kadai on medium flame. Add the whole spices and let them sizzle.
2. Now add the chopped onions and saute till they turn transparent and crisp. Then add the ginger garlic paste and mix well. Let it cook till the raw smell leaves.
3. Now add the chopped tomatoes and mix well till it forms a paste with the onions.
4. Next add the masala powders and salt. Mix well and check the spice level and salt. Add about 1/2 cup of water and close and let it cook till masala powders do not smell raw. This takes around 5-10 minutes.
5. Now break the eggs into the curry and keep mixing to prevent sticking at the bottom. The scrambled egg should mix well with the curry. Switch off heat and serve.

Note: If you want chunkier egg pieces, separate the whites from the yolk and prepare an omelette with the whites and prepare the curry as briefed above with the yolk. Finally add broken pieces of the omelette to the curry.

Jan 24, 2012

Simple Dal Tadka!!!

Hi guys!!!

Everybody has their own list of comfort food and Dal tadka rates among the top items in my list. This is a very simple dish but tastes heavenly. It is a great combination for rotis, rice and for someone like me the dal by itself is great. I mean, I finish off the last bit of the dal even if I am done with the roti or rice :-)

The ingredients required are sure to be in the kitchen at all times and is ready in less than 20 minutes. Just pressure cook the dal and add the tadka to it and u are ready to serve dal tadka. Some people use a mixture of toor dal and channa dal to prepare this dish. Others use only toor dal. You can also use masoor dal like I did. I prefer masoor dal for dal tadka because of the richness of the cooked masoor dal and the golden yellow color without having to add turmeric powder. Now lets see the recipe.

Ingredients:

Masoor dal/Toor dal - 1 cup
Tomato - 1 medium
Green chillies - 1 or 2
Garlic - 2 small pods
Hing/Asafoetida - a pinch
Turmeric powder - a pinch (optional if cooking with masoor dal)
Salt - 1 tsp

To season:
Mustard seeds - 1 tsp
Cumin seeds - 1 tsp
Urad dal - 1 tsp
Red chillies - 2
Curry leave - a bunch
Ghee - 2 tbsp


Procedure:

1. Pressure cook the dal adding 2 cups of water with the chopped tomato, chilli, garlic pods, hing, turmeric powder and salt.
2. Let it cook for 15 minutes or upto 3 or 4 whistles. This lets the dal turn real mushy.
3. Meanwhile, heat the ghee in a kadai. Add the cumin and mustard seeds. When they splutter add the urad dal. When the urad turns light brown add the broken red chillies and curry leaves.
4. Add this tadka to the dal when the pressure is off.

Dal tadka is ready to serve!!! Tastes great with rotis and rice.


Jan 23, 2012

Crispy Prawn Fry!!!

Hi guys!!!!

Yet another prawn recipe :-) This is a simple but delicious appetizer. Lets directly go to the recipe.

Ingredients:

King prawns(peeled and deveined) - 12 or 15
Egg - 1 beaten
All purpose flour - 2 tbsp
Chilli powder - 1 tsp
Salt - 1 tsp
Breadcrumbs - as required
Oil - as required for frying
For Marination:
Salt - 1/2 tsp
Black pepper powder - 1/2 tsp
Soy sauce - 1 tsp

Please ignore the quality of the picture 'coz I was so hungry and had no patience to take good pics :-)


Procedure:

1. Marinate the cleaned prawns with salt, pepper powder and soy sauce for atleast 30 mins.
2. Meanwhile mix the all purpose flour with chilli powder and salt and keep it in a dish. Take the beaten egg in a separate dish and set it next to the flour. Take breadcrumbs in a dish next to the egg.
3. After 30 mins, heat oil in a kadai on medium flame to fry the prawns.
4. Roll the prawn in the flour and shake the excess off. Next dip it in the egg and then roll it in the breadcrumbs. Press the breadcrumbs against the prawn and place it in the oil in the kadai. Repeat the same with all the prawns.

Crispy prawn fry is ready!!!!

Jan 20, 2012

Prawn Biryani!!!!

Hi guys!!!

Biryani is a rich and flavorful Indian dish. Most important fact is that it really does not require a lot of effort to prepare this delicious meal. I prepare some type of biryani every weekend. Lately it has been more often prawn biryani. That is mainly because my husband and I are die-hard sea food fans and I love the flavor prawn adds to the rice.

We tend to have prawns atleast once in a week in some form or the other. And whenever Ganesh sees KIng prawns in the sea food aisle he'll pick it up and say Prawn Biryani or Pulao this weekend and smile :-) As we all know that weekends are lazy days. And by lazy I mean waking up late and sitting in front of the TV not realising that it is almost 1 o' clock and ur stomach starts growling in hunger... Thats when I run to the kitchen telling my husband that it is not going to be sambar, rasam and poriyal day, but instead I can prepare biryani. And not even once has this option disappointed him. Who can be disappointed to have biryani right???

So enough with biryani stories. Here goes the recipe.

Ingredients:
Serves - 2 people

Basmati rice - 2 cups
King prawns (peeled and deveined)- 12 or 15 (depending on size)
Onion - 1 big
Tomato - 1 big
Green chillies - 2 chopped
Ginger & Garlic paste - 1 tsp
Corriander leaves - a bunch
Mint leaves - a bunch
Turmeric powder - 1/2 tsp
Chilli powder - 1 1/2 tsp
Corriander powder - 1 tsp
Cloves - 4
Cinnamon - 1" stick
Cardamom - 2
Star Anise- 1
Bay leaves - 2
Oil & Ghee - 1 tbsp each
Salt - as required


Procedure:

1. Wash and soak the basmati rice for around 15 mins. Drain the water completely and set aside.
2. Heat the oil and ghee in a pressure cooker. Make sure the flame is in medium heat. Add the whole spices and let them sizzle for a minute till they release the flavor.
3. Now add the chopped green chillies and the mint and corriander leaves and saute till the leaves wilt.
4. Next add the lengthwise slit onions and saute till they turn transparent and crisp.
5. Add the ginger garlic paste and mix well. Now add the chopped tomatoes and mix well. Let it cook till the tomatoes are cooked and forms a paste with the onions.
6. Now add the cleaned prawns and mix well. Now add all the masala powders and salt and mix well with the prawns. Close the lid with some gap and let the prawns release the moisture and get cooked for a few minutes. Make sure to saute in between so that there is no sticking to the bottom.
7. Now add 3 cups of water to the cooker. Generally for biryani the ratio of water to rice is 1.5:1. This ratio results in rice not being sticky. Then add the rice and stir well.
8. Finally sprinkle a few drops of ghee and add some chopped corriander and close the lid of the cooker.
9. Let it cook for 10 minutes under pressure or upto 2 whistles and remove from heat.

Serve hot with raita and boiled egg. A fantastic weekend lunch!!!!

Jan 19, 2012

Oven Baked Fish and Chips!!!

Hi guys!!!

Fish and Chips is a popular British dish. Here in the UK, you can find fish and chips restaurants in every nook and corner. With 6 months having passed on since I reached here I have not tried fish and chips in any restaurant. Infact, there is a restaurant just 2 blocks from my apartment. Every time we walk past the restaurant I tell Ganesh that we have to grab a bite there in the weekend. But just like every other weekend we watch TV and lazily spend the time on the couch :-)

I actually wanted to try making fish and chips at home for a while now and finally gave it a shot. The traditional British fish and chips is prepared with a beer batter coating for the fish and deep frying the fish in oil. I had to rule out the beer batter and did not wanna deep fry either. So came up with this recipe. I used TROUT for the dish and it tasted just perfect. Usually white fleshed fishes are used for this. But you can take my word and use salmon/trout as well.

So lets take a look at the recipe.

Ingredients:

For fish:
Any firm fleshed fish fillet - 2 medium size fillets
All purpose flour - 1 tbsp
Chilli powder - 1/2 tsp
Egg beaten - 1
Bread crumbs - as required
Pepper powder - 1 tsp
Salt - 1 tsp

For chips:
Potato - 1 large
Olive oil - tsp
Salt - 1/2 tsp
Pepper powder - 1/2 tsp


Procedure:

1. Preheat oven to 220C with a baking sheet lined with foil inside.
2. Peel the potato and slice them into wedges half an inch thick. Pat dry the wedges in a kitchen tissue.
3. Mix the olive oil, salt and pepper together. Add the wedges to this mixture and mix thoroughly.
4. When the oven has reached 220C take the baking sheet out and spread the prepared wedges evenly on the sheet and place it back. It takes around 15-20 minutes depending on the oven for the chips to be ready. You know the chips is done when the edges turn brown.
5. Meanwhile prepare the fish. Wash the fish and pat dry. Take the all purpose flour along with salt and chilli powder and mix well. Take this in a dish and keep it handy.
6. Crack the egg in a bowl. Add a pinch of salt and pepper with it and beat well. Keep this next to the dish with the flour.
7. Take some breadcrumbs in a separate dish and keep it next to the beaten egg.
8. Take a fish fillet and dust it with the flour mixture and shake off the extra flour. Next dip it in the egg. Again pat it in the flour mixture followed by dipping it in the egg. Finally roll it over the breadcrumbs. Press the breadcrumbs against the fish so that they stick on.
9. Repeat the same with the other fillet.
10. Once you have removed the chips from the oven, use the same backing sheet to place the fillets and pop it back in the oven. The fish again takes around 15 minutes to cook. You know it is ready when the surface starts to turn golden brown.

The fish and chips is ready. Tastes great with tomato ketchup. Tasty and healthy!!!!!

Jan 18, 2012

Pepper chicken curry!!!


Hi guys!!!

When I sit down to blog about the pepper chicken curry I am reminded about a very sweet incident in my life. The day Ganesh and I got engaged, he took me out for dinner and as we were guided to our table he whispered in my ears 'For one day put aside ur diet and calorie calculation and eat properly. I am so happy today and don't wanna see u across the table drooling over the food and fighting urself from having too much'. Even now I don't know if this is a romantic or funny incident. :-)

What is the connection between the incident and pepper chicken??? If any of u have guessed already, yes, we had pepper chicken that day. Although it was pepper chicken fry and that was the first starter we had that day.. I have prepared pepper chicken curry a couple of times before but always felt something was missing. Finally last week, when I altered the usual recipe a little bit it turned out just mouthwatering tasty. This is a spicy curry and goes well with rotis.

So here goes the recipe.

Ingredients:
Serves - 2 people

Chicken - 300 gms
(I used boneless chicken breasts)
Onion - 1 big or 2 medium
Tomatoes - 1 big or 2 medium
Green chillies - 2
Ginger & Garlic paste - 1 tsp
Turmeric powder - 1/2 tsp
Chilli powder - 1 tsp
Corriandeer powder - 1 tsp
Fennel powder - 1/2 tsp
Black pepper powder - 11/2 tsp
Cloves - 4
Cardamom - 2
Cinnamon - 1" stick

To season:
Oil - as required
Mustard seeds - 1 tsp
Cumin seeds - 1 tsp
Curry leaves - a bunch


Procedure:

1. Heat oil in a kadai and add the mustard and cumin seeds. When they splutter add the curry leaves.
2. Next add the chopped onions and saute along with a pinch of salt. Adding salt helps the onions to be cooked faster. Saute till the onions are cooked and crisp.
3. Now add the cloves, cardamom,cinnamon, chopped chillies, ginger garlic paste and turmeric powder. Saute well and let it cook for a couple of minutes. The ginger garlic paste and turmeric powder takes some time to be cooked. You know it is done when the raw smell goes away.
4. Now add the tomatoes and saute till the onions and tomatoes are combined well and form a paste. This takes a couple of minutes.
5. Next add the diced chicken pieces and mix well. Following this add all the masala powders except pepper powder. Mix well so that the masala powders cling on to the chicken pieces.
6. Add the required amount of salt and mix again. The heat needs to be on medium. You can close the lid and let the chicken cook for about 10 minutes. There is no need to add water 'coz chicken releases moisture when cooked on medium heat.
7. Just stir now and then to ensure no sticking to the pan. When the chicken is completely cooked add the black pepper powder and mix well. Switch off heat and garnish with corriander leaves.

The spicy pepper chicken curry is ready!!!

Jan 17, 2012

Avial / Pongal Kuzhambu!!!!


Hi guys!!!

Here comes the next recipe from my Pongal dishes. Yes it is the yummy avial made at home every pongal day. This avial is way different from the typical Kerala avial which is prepared with curd and coconut milk. This one is more like a curry and I believe it is referred to as the Pongal kuzhambu in some parts of Tamilnadu. I know this 'coz when I told my husband that we were gonna have pongal rice with avial he gave me a surprised look and when he saw the prepared dish on the table he said 'Idhu pongal kuzhambu di.. Oru niminsham manushana kuzhapitiye' :-)

I remember last Pongal when mom and me were cutting all the vegetables from as early as 3 am. She was telling me the names of most of the vegetables 'coz I did not know most of them. She also said that it was a tradition that we prepare the dish with the number of vegetables used being 11, 15, 17 or 21.. Trust me it is so hard to find Indian vegetables abroad. I could hardly pick up 7 vegetables for the avial this time. The more vegetables we add the more flavor is added to the avial. Most importantly, any type of potatoes, drumstick and plaintain (Vazhakai) must be added. Also, the usual method involves cooking dal and vegetables separately. But I opted to go the quick way :-)

OK, so here goes the recipe.

Ingredients:
Toor dal - 1/2 cup
Assorted vegetables diced - 2 cups
(Beans, Carrot, Plaintain, Brinjal, Potato, Drumstick, Broad beans, arbi, yams etc.)
Tamarind juice - 1 cup
Turmeric powder - a pinch
Chilli powder - 1 tsp
Corriander powder - 1 tsp
Fennel powder - 1/2 tsp
Sambar powder - 1 1/2 tsp
Grated coconut - 1/2 cup
Salt - as required

To season:
Oil - as required
Mustard seeds - 1 tsp
Cumin seeds - 1 tsp
Red chillies - 3 nos
Curry leaves - a bunch


Procedure:

1. Pressure cook the dal and the vegetables with 5 cups of water and a pinch of salt for upto 3 whistles.
2. When the pressure is off, remove the lid and ensure the heat is on medium flame. Now add the tamarind juice and mix well.
3. Next add the turmeric, chilli, corriander and fennel powder and mix. When the raw smell from the turmeric leaves, add the sambar powder. Let it cook for about 10 mins.
4. Meanwhile, grind the grated coconut with a bit of jeera into a paste. Add this paste to the avial when the raw smell of the masala goes away. Simmer for 5 mins.
5. Heat oil in a kadai and add the mustard and cumin seeds. When they splutter add the red chillies and curry leaves. Add this tadka to the avial and switch off heat.

Serve hot with rice. Tastes just yummy... !!!!!!

Jan 16, 2012

Sweet Pongal / Sakkarai Pongal!!!!

Hi guys!!!

Hope everyone had a great Pongal. I did!!! This was the first Pongal after my wedding and it really went well. I didn't screw up any of the dishes for a start :-) The only downside was that I missed being with my family (sigh)!!!!

What is Pongal without sakkarai pongal right??? I made the pressure cooker version indeed. But I am sure even with this shortcut method it tastes just heavenly!!!! This is an easy to make dessert for any other occasion as well. So here goes the recipe.

Ingredients:

Raw rice - 1 cup
Moong dal - 1/3 cup
Grated jaggery - 1 cup (adjust according to ur own level of required sweetness)
Grated coconut - 1/2 cup
Milk - 1/2 cup
Cardamom powder - 1 tsp
Cashew nuts & Raisins - 2 tbsp
Ghee - 1 cup + 2 tbsp


Procedure:

1. Heat the 2 tbsp ghee and fry the cashew nuts and raisins and set aside.
2. Pressure cook the soaked raw rice and moong dal with 3 cups of water and the milk until the rice and dal turns mushy. It takes about 15 mins.
3. When the pressure is off open the lid and add the grated jaggery and mix well. Make sure the flame is on medium heat.
4. When the jaggery has completely mixed with the rice and dal, add the grated coconut and mix well again.
5. Now add the cardamom powder and ghee. Be generous with the ghee 'coz this really makes the dish really rich and flavorful.
6. Finally add the fried cashews and raisin and turn off heat.

Yummy sakkarai pongal is ready!!!


Jan 14, 2012

Happy Pongal!!!!

It is festive time again and I would like to wish all my friends a very happy pongal!!!!
Hoping to post the Pongal recipes soon :-)

Prawn Masala / Iral thokku !!!!

My husband is fond of seafood and anything cooked with prawn makes him so restless and he drives me crazy before I can finish the dish. :-) This prawn masala is a very simple dish and I prepare them almost on a fortnightly basis.

The advantage of being abroad (one advantage I should say) is that cooking non-veg becomes so easy. The reason being, the meat is well cleaned and packaged. Ofcourse, the downside is that we don't  get to eat fresh meat. But still with the overhead of cleaning the meat eliminated, the dish does taste all the more better :-)

As I said, this is a very simple recipe. The dish can be prepared in a jiffy with the least number of ingredients.

Ingredients:
Serves -  2 people

Prawns (deveined and cleaned) - 200 gms
Onion - 1 no
Tomatoes - 1 no
Ginger & garlic paste - 1 tsp
Turmeric powder - a pinch
Chilli powder - 1 1/2 tsp ( vary according to required level of hotness)
Corriander powder - 1 tsp
Salt - as required

To season:
 Oil - tbsp
Mustard - 1 tsp
Cumin seeds - 1 tsp
Curry leaves - a bunch


Procedure:

1. Heat oil in a kadai on medium flame. When hot, add mustard and cumin seeds. When they splutter add the curry leaves and saute.
2. Next add the chopped onions and saute till they turn translucent and crisp. Then add the ginger and garlic paste and saute till the raw smell vanishes.
3. Now add the chopped tomatoes and saute till they are cooked and mushy and form a paste like consistency with the onions. This should take a couple of minutes.
4. Now add the prawns and mix well with the paste. Then add the masala powders and salt and mix well. There is no need to add water since the prawns when cooked let water out. If you feel, the masala sticking to the bottom then sprinkle some water.
5. Cover and cook for about 10 mins. You know it is done when the prawns are coiled up and well absorbed in the masala. Switch off heat and garnish with corriander leaves. the masala is ready :-)

I have found this dish perfect for rotis. But I am sure this should go well with rice and sambar/rasam.


Jan 13, 2012

Tangy Arbi Curry / Cheppankizhangu karakuzhambu!!!

Hello friends!!

Yesterday when I went grocery shopping I picked up vegetables keeping Pongal in mind. What is Pongal without Avial right???? So Arbi / Cheppankizhangu had to be picked up. We generally ( by we, I mean my husband) prefers arbi deep fried. But for once I wanted to cook it without using so much oil. And ended up preparing this tangy arbi curry.

Karakuzhambu is not a favorite here at my home. But once in a while, I do prepare them. This curry was sure to be eaten without a frown 'coz it had arbi in it :-)

So lets take a look at the recipe.

Ingredients:
Serves - 2 people

Arbi / Cheppankizhangu - 200 gms
Onion - 1 medium size
Tomato - 1 no
Green chillies - 1 or 2 (depending on how spicy you prefer)
Tamarind juice - 1 cup
Grated coconut - 1/2 cup
Jeera - 1/2 tsp
Curry powder / Kuzhambu milagai podi - 2 tsp
Salt - as required

To season:
Mustard - 1 tsp
Jeera / Cumin seeds - 1 tsp
Fenugreek seeds - 1/2 tsp
Cuury leaves - a bunch
Oil - as required


Procedure:
1. If using tamarind pulp, soak them in warm water for about 15 mins and extract the juice. Make sure you have about 1 cup of the juice.
2. Chop the onion, tomato and chillies. Also, slice the arbi in small discs and set aside.
3. Heat oil in a kadai. When it is hot enough add the mustard and cumin seeds. When they splutter add the fenugreek seeds. When the fenugreek seeds start to turn brown add the curry leaves.
4. Then add the chopped onions and chillies and saute till the onions turn translucent and crisp.
5. Next add the tomatoes and saute till they are cooked. You know it is ready, when the onions and tomato blend well and form a paste with the oil starting to leave the sides.
6. Now you add the tamarind juice followed by the curry powder and salt. Cover and cook till it starts to boil.
7. When the curry starts to boil, add the arbi slices. Cover and cook for about 10 mins or until the arbi is cooked.
8. Meanwhile, grind the grated coconut with the cumin seeds into a paste. Add this coconut paste to the curry once the arbi is cooked till tender.
9. After you have added the coconut paste, simmer the curry for 5 mins.
10. The curry is ready. Serve with hot rice and papad.

The best thing about this curry is you really do not feel the need to have a poriyal 'coz of the arbi in the curry :-)


Jan 12, 2012

Simple Butter Cookies!!!

Hi guys!!!

I am here with my first recipe. I tried to bake some butter cookies yesterday and am glad they turned out really well in the first try... Yay Me!!!!!

What I loved most about baking the cookies was the aroma that filled the entire house. And, I loved the reaction on my husband's face when he took his first bite. What is more worth than that compliment :-)

The whole process took close to 30 mins. Yes my friends you can bake these wonderfully easy yet very very tasty cookies in less than no time.So here goes the recipe:

Ingredients:
Ghee/Butter - 1/2 cup
Sugar - 1/2 cup
All purpose flour - 1 1/4 cup
Baking powder - 1/2 tsp
Salt - a pinch


Procedure:
1. Preheat the oven to 180C.
2. Mix together the sugar and ghee/butter till u get a creamy texture.
3. Blend the dry ingredients (flour, baking powder and salt) separately.
4. Now add in the sugar mixture to the flour mixture and knead to form a dough. Something like the chapathi dough. The dough must be a little sticky so adjust the flour accordingly.
5. Place an aluminium foil on a baking tray. Make small balls , slightly flatten it and place it on the baking tray and bake for just 10-12 minutes depending upon your oven. mine took 12 minutes.
6. You will know that it is done when the cookies start leaving the tray and the outer layer starts to become golden brown. The cookies will be soft when u take them out but once cooled they will be crispy.
7. Cool and store it in an air tight container.

This recipe yields around a dozen cookies.

Bake these delicious butter cookies and enjoy as a tea time snack.

Cheese...... Calories... C..!!!!!!


CHEESE... You don't have to be Jerry to love cheese. I can bet that 9 out of 10 people would agree that cheese adds richness and flavor to food. If you are one of the people who super clean the dish u made the lasagna or lick ur finger away when u drop a bit of cheese when cooking, keep reading :-)


Having gotten used to only seeing cheese slices or spreads (AMUL Cheese mostly) in India, I get completely lost when I stop by the Cheese aisle in the supermarkets here in the UK. Not to mention, the varieties of cheese that are available. When we go grocery shopping and I hit the cheese aisle, Ganesh tells me that he will finish up the rest of the shopping and let me decide which one I am gonna take home. He gets really pissed off when I still walk up and down after 5 minutes and have not settled on which one to buy. I generally end picking up mozzarella for pizza, garlic bread etc.. But still I love wandering around the cheese aisle :-)

Now coming to the title of the post.. I remember the first time I had lasagna. It was in Chennai. Ganesh took me to an Italian restaurant named Bella Ciao right next to the Thiruvanmiyur beach. You get authentic italian dishes there and he took me there to prove that native italian pizzas are way better than Dominos. We ordered a pizza and a lasagna. I still remember Ganesh telling me that it was too much and we might not be able to finish it up ( The reason for this statement was, he was used to seeing me having just 1 dosa or 1 chapathi for dinner). I also remember when he was dumbstruck to see me go wild with the lasagna and pizza. With every bite I was going Mmmmmmmmm CHEEEEEEEEEEEEEEESE..... The truth was internally I was going Mmmmmm Cheeeese.... OMG Calories... Oh Crap!!!! I always wondered why does Cheese and Calories have to start with the same alphabet. I think of 'C' and start dreaming about Cheese and end counting Calories.


The reason I wanted to share this is because I am sure any cheese lover will also be worried about the calories that come with it. All I have got to say is, Relax guys!!!! U dont have to count calories everytime u wanna eat something that pleases ur palette. Or atleast I say this to myself :-) ( I guess I am gonna eat pizza tonite)

Jan 11, 2012

Hello ladies!!!!


A Desperate Housewife's Diary!!!! When I thought I was about to start a blog this was the first title that popped in my head.. Is there a reason as to why I chose this blog title????

Yes... I am a big fan of the Desperate Housewives TV series. The final season has just started to be on air last weekend and I am already excited about watching the whole series!!! ( Aaaah!! Now I remember mocking my mother for being a TV serial addict... Hellooo.. She was a desperate housewife too.. )

But is that the only reason... I don't think so... I realise that every housewife is desperate in some level. Especially those who are new to being a housewife (like me). After years of being busy, waking up and running to office and having a breakfast on the way(if not skipping it) and having a cold lunch, staring at the monitor and having dinners at odd times and rarely getting any sleep and LOOOOOOOOONGING to have a break from the "horrible" life.. Now having the break that I always wanted, all I do is sit and apply for jobs and want badly to get back in the old cycle rather than appreciating all the time I have got for myself... The time that I can use to groom myself into a better home maker.. A better cook who can achieve making my husband fat.. (just kidding, or am I??)..

So I have decided to start in full gear blogging my kitchen experiments along with anything else I find is worth sharing with friends.. Yes, I am desperate to be a good housewife.. Wish me luck.. Oh yeah, I am thinking of baking a batch of butter biscuits ( I miss the Ganesh bakery's butter biscuits..) this afternoon.. Hope to start my recipes section with butter biscuits..

See you soon ladies and Happy blogging!!!!!


Related Posts Plugin for WordPress, Blogger...